People may or may not know that I opened my own little shop on Etsy.com, Athena's Arthouse. I have been crafting designs inspired by my surroundings, long drives through the countryside, memories, and ideas from novels and poetry. I am using fabric cut from old t-shirts, jeans, pants, skirts, dresses, blouses, sheets, pillowcases, etc... Anything that can't seem to serve it's intended purpose and can be recycled into a new piece of art. Some clothing I have bought from places like Goodwill or thrift shops when I noticed most of the fabric was fine except for an unsightly stain somewhere, which is why it hadn't been bought yet. No problem, I can cut that away and use the rest of the shirt or skirt for several fiber art pieces. I also am recycling wooden plaques that once proudly displayed brass plate awards. I have over a hundred of these things and I am working to create each one into proud display of one of my fabric collages.
I'm new to this Etsy shop selling and to sewing in general. I am hopeful that people will like my little artworks. Here's a link to the store:
Showing posts with label fabric. Show all posts
Showing posts with label fabric. Show all posts
Sunday, December 12, 2010

Sunday, August 22, 2010
baby photo album covers
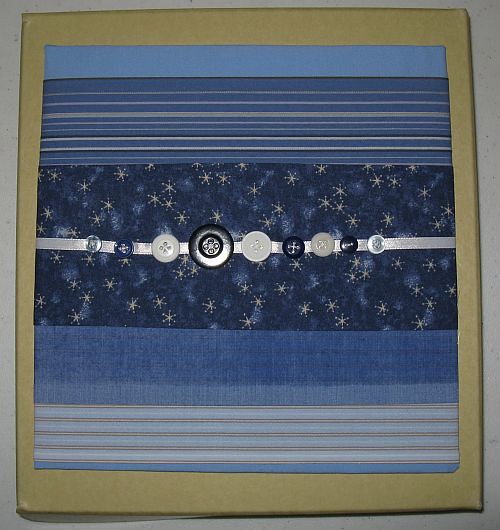
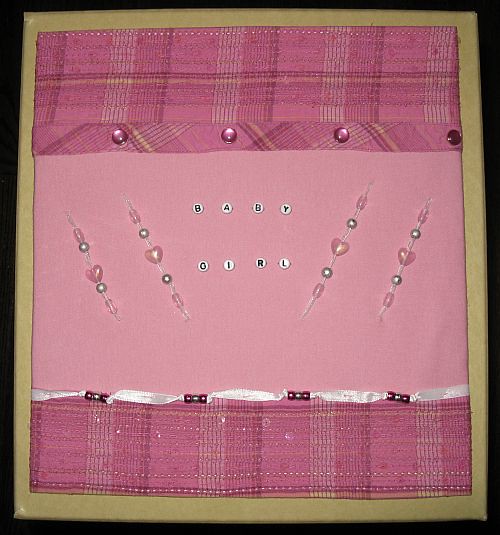
A few of my co-workers commissioned me to create something creative for these clam-shell binders that we filled with archival photo sheet protectors. We turned them into photo albums where the new mothers can print and store photos of their newborns.
 The first was having a baby boy, but I didn't know what colors she was using in decorating the baby's room, but the baby boy blue still worked out just fine. This was my first try, but I think it looks pretty good. I used two old shirts (the two striped pieces) and three swatches of new fabric in the design. It needed some more interest so I added the ribbon and buttons. I used HeatnBond Ultrahold fabric adhesive to adhere the fabrics to each other. Then I used a low-temp glue gun to wrap the fabric around a matte board I pre-cut to place on the binder's cover. I did not want to puncture the binder itself because that would weaken the cover and open holes for pests and dust. It was dull looking with just the fabric, so I decided to stitch down some ribbon and buttons for interest. I probably could have done this prior to gluing it to the board, but I also think that stitching through the board secures the buttons and thread more. I then glued the finished cover to the front of the clam-shell binder, and voila! Baby Boy Blue Cover for a photo album.
 The second one was for a co-worker having her first baby girl. The new momma-to-be is all about pink and bling, so I knew that it needed to have a little more glitz than the Baby Boy Blue. I used to have a pretty pink button-down shirt that had some clear sequins stitched in the front, so I cut two swatches of this fabric, including the gem snap-buttons. I used this for the top and bottom sections of the design. The middle swatch of fabric comes from a pink knit shirt I found in Goodwill years ago. I dug around in my beads and found a few that seemed to match and add some bling to the overall feel of the cover. The beads on the ribbon in the middle section can slide up and down a little on the iridescent ribbon. The beads and ribbon at the bottom half hide a rough edge in the pink plaid, and it was stitched down in-between each bead section. I am not a big fan of pink, but this one turned out quite well, I think! Hello, Baby Girl Pink Cover.
Monday, March 1, 2010
fabric flowers, birds, turtles...

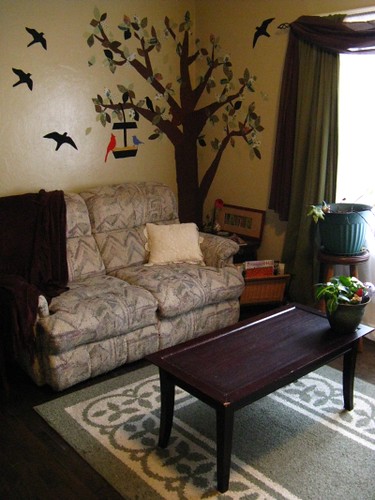
I have seen adhesive vinyl decals of really neat designs online, but they all were out of my budget range. Then I learned of a friend who couldn't paint the walls in her bathroom in her rental apartment, so she applied a light-weight cotton fabric to the walls with spray starch. Voila! Wallpaper without the hassle, and when you move out simply spray with water, peel off the fabric, clean the walls of the residue and you're done! So I thought, I can do this instead of purchasing vinyl decals!
Looking for some tutorials on how to do this? Try here. Someone tried out a mod design on a door. Or check out ohdeedoh's How To: Make Fabric Wall Silhouettes. Strange how I didn't see these pages back in December 2008 when I created the tree in my living room.
Subscribe to:
Posts (Atom)